





As we already said in How to configure WC - APG Weight Shipping 2.0?, the correct configuration of the taxes in WooCommerce is fundamental, especially if you are going to sell in your virtual shop to EU countries, non-EU countries or to tax-exempt areas, as happens with our Ceuta, Melilla and the Canary Islands. On this configuration will depend whether the calculation of the shipping costs or of the prices of the products is worked out properly and legally, or not. Let us look quickly at how the taxes have to be configured in WooCommerce 2.6 to save ourselves headaches with our customers and with the tax authorities.
Configuration
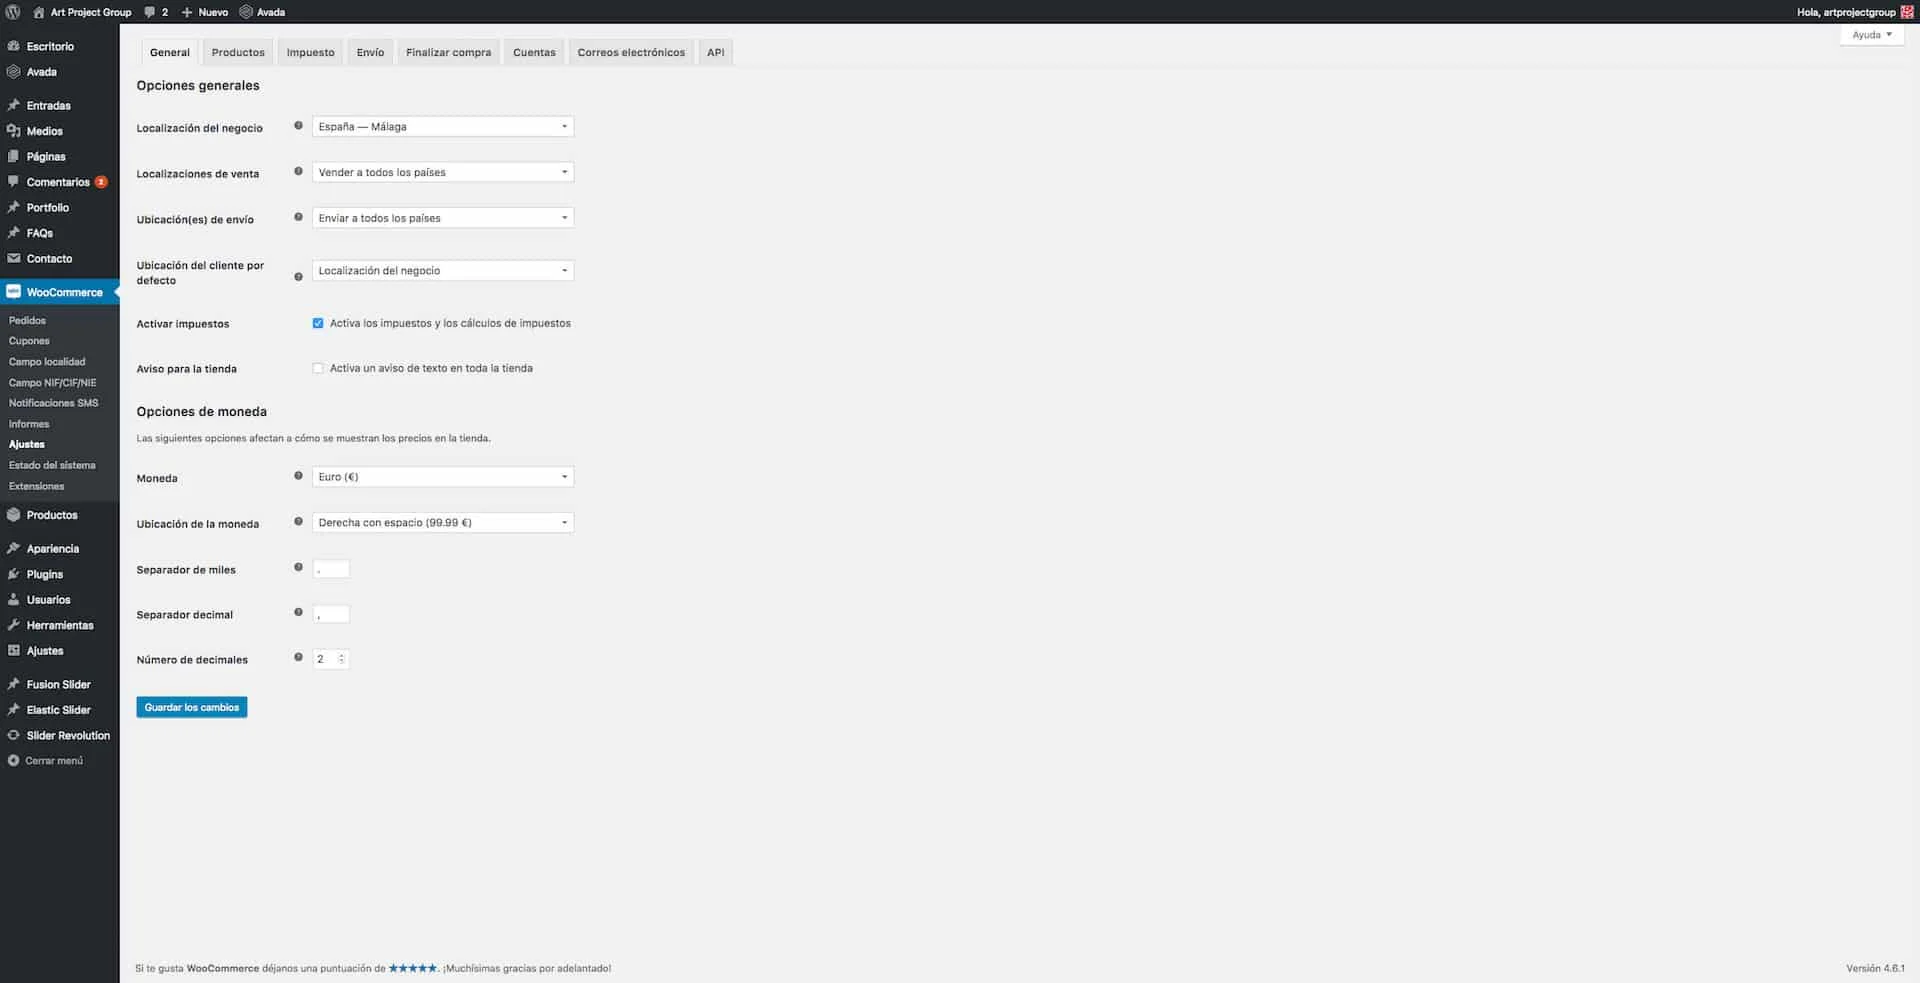
Before we can carry out any kind of configuration of the taxes, the first thing we have to do is tell WooCommerce that we need to work with taxes. To do it you have to go to WooCommerce -> Settings, tick the checkbox called Enable taxes, which, as it rightly tells us, enables tax rates and calculations, and Save changes, after which a new tab called Tax will appear, which is the one we are really interested in in this tutorial.
To reach the tax configuration we must go to WooCommerce -> Settings -> Tax, where we will come across the Tax options. In them we have different settings which, although at first sight it seems very complicated, in reality are very simple. We attach a screenshot with the standard configuration we use most, so let us go on to look at its different options in detail:
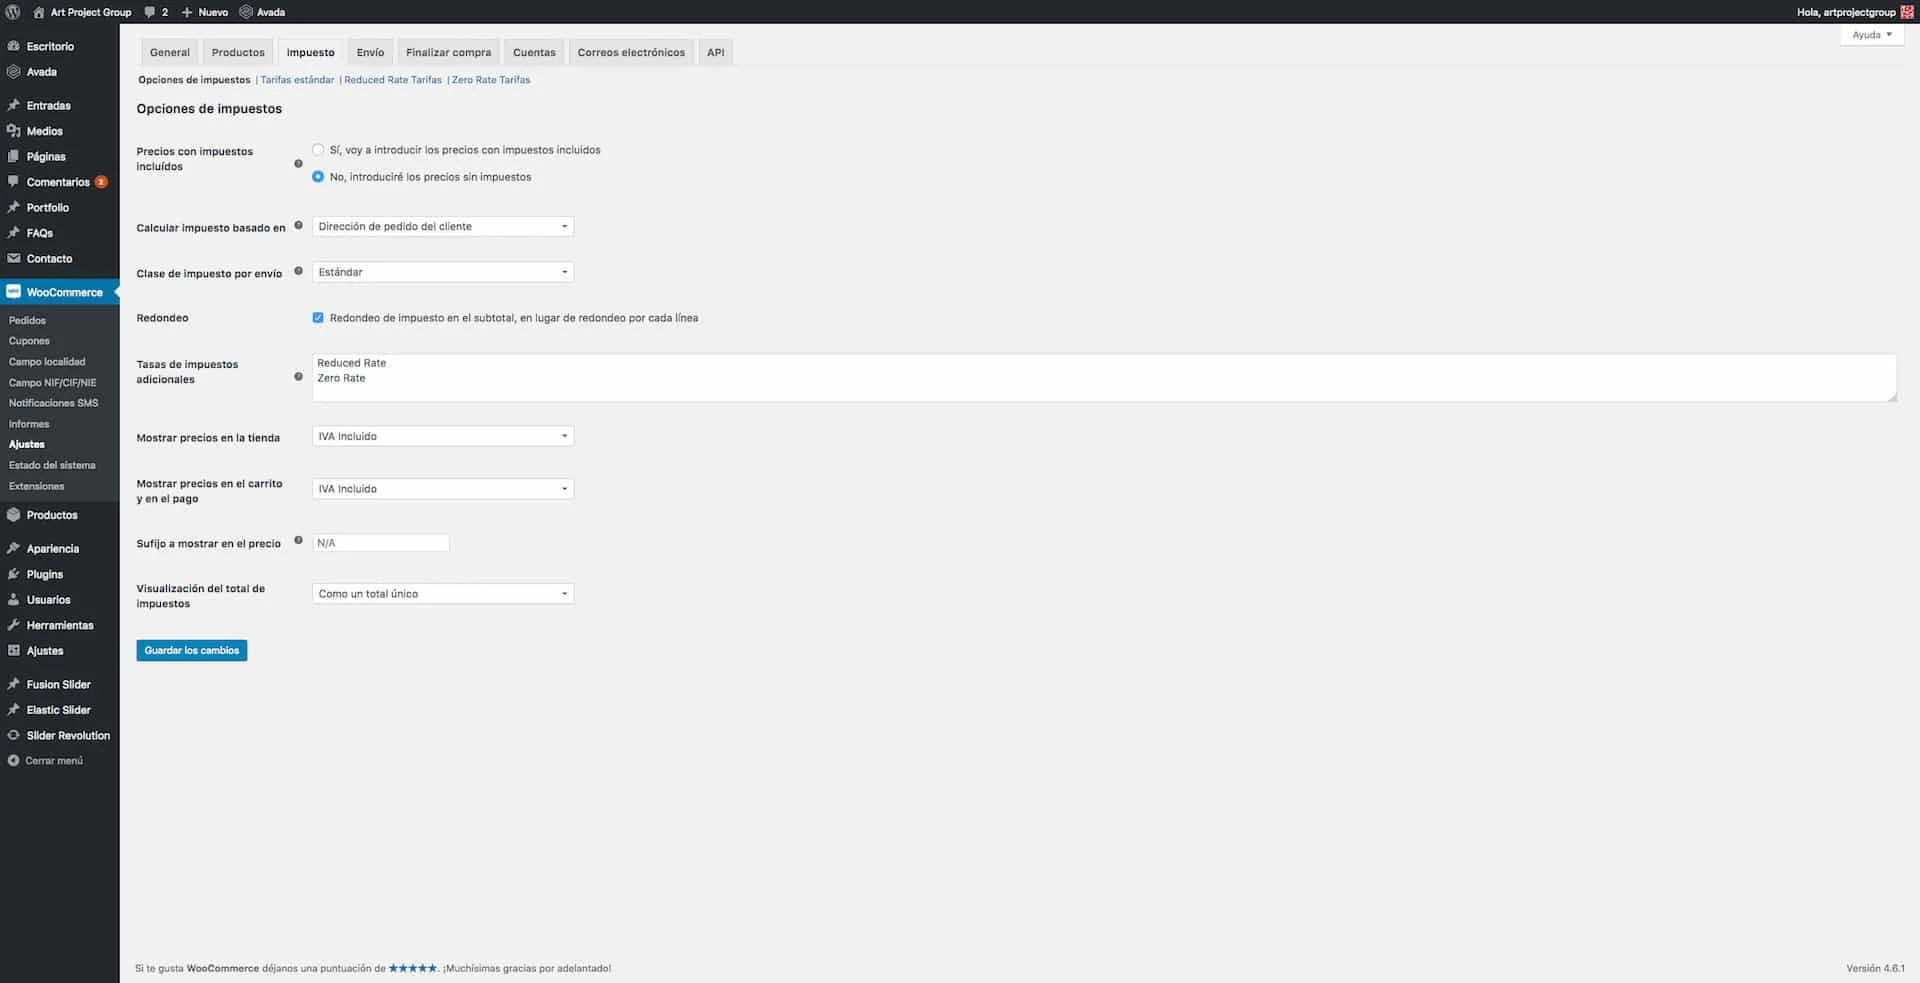
- Prices entered with tax: in case you are going to sell in areas with different kinds of tax, it is more than advisable that you choose the option No, I will enter prices exclusive of tax. We will leave the option Yes, I will enter prices inclusive of tax exclusively for those online shops in which we are not going to sell to any tax-exempt area.
- Calculate tax based on: here you will come across three options. These are: Customer shipping address, Customer billing address and Shop base address. In this field the best option is Customer billing address, since it is the one the invoice has to be issued against and it is that one which has to bear, or not, the taxes of the order.
- Shipping tax class: in this selection field we come across these options by default: Shipping tax class based on cart items, Standard, Reduced Rate and Zero Rate. In Spain the shipping costs bear a tax of 21%, except in the VAT-exempt areas, so at APG we usually leave the option Standard selected, which is where we usually configure the tax at 21%. In case your virtual shop has more kinds of tax, 10% and/or 4%, you must select the name of the tax rate you have configured for 21%.
- Rounding: if you tick this checkbox you tell WooCommerce that you want to round tax at subtotal level, instead of rounding per line. At APG we always leave it active.
- Additional tax classes: in this text area you can change the names of the additional tax classes that WooCommerce provides by default, remember that they are the ones that appear in the Shipping tax class field, or add new classes. We will see later where these are configured.
- Display prices in the shop: in this selection field you can choose between Including tax and Excluding tax, so the prices of your products will be shown in the shop with the taxable base or with the taxes added. At APG we recommend always selecting Including tax, above all to give our customers more clarity when buying.
- Display prices during cart and checkout: it works exactly as in the previous field, although on this occasion the selection affects the shopping cart and checkout pages. Here again we recommend selecting Including tax.
- Price display suffix: in this text field a suffix can be added that will be shown after the price. It is very common to see the typical legend “(incl. VAT)”, although at APG we never use this field, so we recommend leaving it blank, just as it comes by default.
- Display tax totals: lastly we have a selection field where we can choose between As a single total and Itemized. Unless your virtual shop bears more than one kind of tax in the prices of its products, we recommend that you select the first option, As a single total, since it is the one that returns the information in the simplest and cleanest way for customers.
With these settings and configurations we now have the way we want WooCommerce 2.6 to work with the taxes in our virtual shop properly configured; now it remains for us to tell it what percentage it must charge and where.
Standard rates
To tell WooCommerce the percentages of the tax rates and where they must be applied, we have to select the second option of the Tax tab, called Standard rates, where we will configure, assuming that our main tax is 21%, something like this:
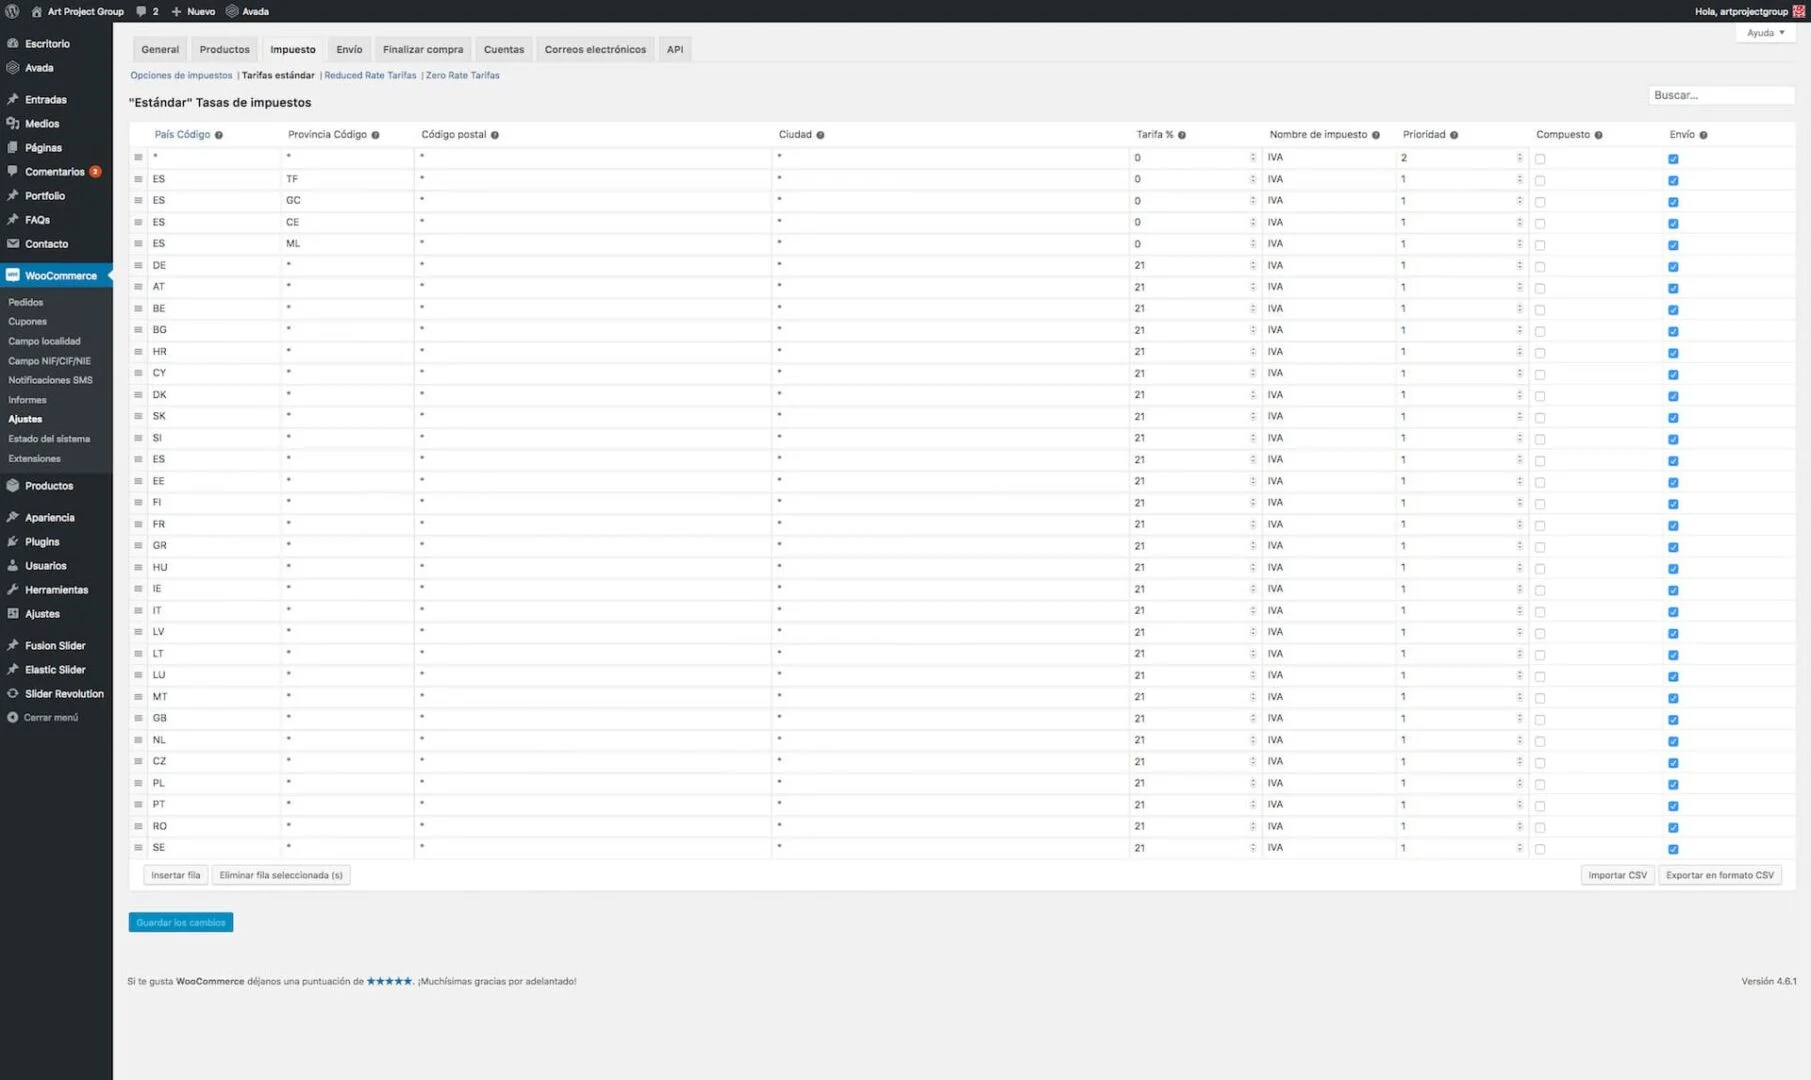
In short, what this configuration sets out, in order, are the following taxes:
- Tax at 0% for all those countries that are not given in this list.
- Tax at 0% for the Spanish provinces of Santa Cruz de Tenerife, Las Palmas, Ceuta and Melilla.
- Tax at 21% for all the countries of the European Union.
Watch out, because the tax at 0% must also be applied to the shipping costs, given that VAT cannot be charged on any item in those areas.
Given that the configuration list is very long, and so that you do not have to replicate the configuration line by line, we leave you a CSV file that will import this same configuration for you easily and quickly thanks to the Import CSV option. To get it you only have to click on the WooCommerce icon that is below this box:

In case your virtual shop bears more than one kind of tax you must replicate this list for the 10% and/or the 4% VAT in its corresponding additional tax class. Watch out, do not even think of importing this same CSV file, since it is going to duplicate the fields in the standard rate at 21%. You can modify it so that it imports the same list for you with the appropriate percentage in the tax class you have created; it is really simple, and if you do not know how to or you do not want to do it, remember that APG has its Support centre at your disposal, which you can make use of thanks to the flat rate of our technical support, so do not waste any more time and let us help you with the configuration of your taxes.
Products

Once we have configured the tax in our virtual shop, all that will remain for us is to add the products to it and, although it may be stating the obvious, remember that you must enter the prices exclusive of tax if you do not want the retail price of your products to be increased wrongly. In case you bear more than one kind of tax, remember that you must select the appropriate tax for each product in the Tax class selection field of the General tab, but this part is now something that goes beyond the purpose of the tutorial that concerns us, so we leave you to experiment or to look for documentation on the matter.
Result
Thanks to the correct configuration of the taxes of your shop you will avoid any kind of problem with the calculations of the prices of your products and shipping costs, and obviously you will forget about having any kind of problem in this respect with your customers or with the tax authorities. Cheer up: as you have been able to see, it is not that difficult!
Related posts



Comments
Products and services
-
 Security Improvement
181,50 €
-
 Virus removal
From: 242,00 €
-
 WP Total Updater
From: 42,35 € / MONTH
-
 APG Multisite Suite
From: 95,59 €From: 71,39 € -
 GDPR compliance
From: 145,20 €

Art Project Group is now available in English. The whole site is translated: every plugin page, the full documentation and the support centre.
artprojectgroup.com #WordPress #WooCommerce

How do you set up WC - APG Cont4?

Se ha publicado #WooCommerce 11.2.2: actualización de seguridad que refuerza las API REST y Store, mejora la validación de CSV y corrige problemas en pagos y pedidos. Incluye cambios en la base de datos.
¡Actualiza cuanto antes!
¿Cómo se configura WC - APG myGESTIÓN?

¿Cómo se configura APG Multisite Suite?



Hola,
Buen tutorial y detallado.Pero después de miles configuraciones tengo varios problemas:
– WooCommerce me calcula mal los impuestos de envío,he intentado de dos formas,poner el precio sin rebajar en la configuración de envío y después manualmente sin IVA,los envíos son 5,95 con Iva.Pero me calcula mal en el carro de la venta y finalización de compra.
-En cuanto a los productos,he subido los productos con los precios con Iva tal cual me lo proporcionó mi distribuidor en csv.Mi duda es si tengo que aplicarle o restarle a mis productos el 21% en la sección de productos con el editor de WooCommerce antes de configurar el apartado de impuestos.
Espero que puedas ayudarme tengo la tienda a una semana de activarla pero esto me tiene cabeza,estoy pensando en dejarlo con los impuestos ya incluidos tanto productos y envíos y buscar algún plugin para facturas detalladas q englosen con detalle el Iva adjuntándolo al correo de pedidos.Si es que hay algún plugin que haga esto.
Ya te adelantamos que WooCommerce calcula los impuestos perfectamente, por lo que el problema que describes se reduce a una mala configuración de los mismos.
Para poder ayudarte necesitaríamos ver en detalle el problema que tienes y para ese tipo de ayuda tienes nuestro ticket de soporte.
Un saludo.
Hola buenos días
Como comparar…. el precio volumétrico…. con el precio en peso… y “escoger el mayor de ambos resultados” ?
Ej
A*b*c= xprecio en volumen
KG= xprecio en kg
Como escoger el mayor de ambos precios?
Los cálculos no están pensados para trabajar así. Te recomendamos que utilices peso y medidas en la misma tarifa, o tarifas con peso, o tarifas con medidas, pero nunca todas mezcladas en el mismo método de envío.
Un saludo.